How to make a browser game with p5.js
Learn how to make your own browser game with p5.js!
The Tools
p5.js is a simple graphics library. It’s easy to get started and the documentation is concise and to the point! I was introduced to p5.js through a YouTube channel by Daniel Shiffman, I highly recommend you check out his YouTube channel!
The Goal
The final product is going to be a simple square walking around a grid (see here, this version is actually multiplayer. We’ll get to server/client in a different blog post 😛), but that’s nowhere near the limit of what you can do!
Getting started
Alright, we are going to hop right in! First thing first, download the p5.js complete library from the download page and extract it. We are going to work in p5/empty-example/sketch.js. Alright, now all you have to do is open your favorite editor (I’ll be using VS Code) and follow along!
Drawing a Square
Once you open your sketch.js, you’ll notice two functions already set up for you. In setup we will initialize our environment, and in draw we will describe what should be drawn per frame.
Before we can draw our square, we will need to create something for us to draw it on! For this, we will use createCanvas, which will create a virtual canvas🖼 for us to draw on 🎨🖌
function setup() {
  createCanvas(100, 50); // 100 -> width, 50 -> height
}
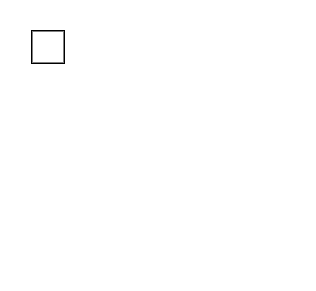
Now if you’ll open up the adjacent index.html file in your choice of a browser, you’ll see… well, nothing yet 😅. We have created the canvas, but we didn’t draw anything on it yet!
To draw our square, we will use the rect function. We will give it the position for where to draw it (x,y) as well as how large it should be (width, height). We will do all of this in the draw function since we want to draw the square for each frame and not just once.
function draw() {
  // x, y, width, height
  rect(10, 10, 10, 10);
}

Now if you open up your browser, you should see a square!
Defining Our World
Time to add some structure to our game-world! Since we are drawing squares, let’s add a grid. To define the grid, I will define a new variable called UNIT which will be in charge of the scale of the world and the consistency.
after defining our world measurement unit, we need to modify our canvas and square to use that unit. For this game, I’ll say that our world is going to be a 10x10 grid. For that, I will also define a WIDTH and HEIGHT, which will define our world size in terms of our world’s unit.
Lastly, we will modify our canvas to use those variables, and our square to draw itself as one unit wide and tall. We will also relocate our square to be positioned at (1,1) in world units.
const UNIT = 32; // each unit in the world is 32 pixels.
const WIDTH = 10; // width, in world units.
const HEIGHT = 10; // height, in world units.

function setup() {
  // width, height
  createCanvas(WIDTH * UNIT, HEIGHT * UNIT);
}

function draw() {
  // x, y, width, height
  rect(1 * UNIT, 1 * UNIT, UNIT, UNIT);
}
Our square is now one unit wide and tall, and our world has more consistency to it as everything would use that one unit of measurement!
Drawing the Grid
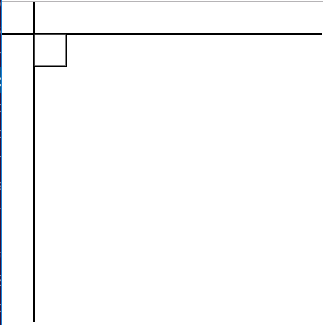
To draw our world’s grid, we simply need to draw a line horizontally, as well as vertically, per unit. To do so, we will use the line function. The line function requires a start position (x1,y1) and an end position (x2,y2).
For a horizontal line, we keep the y value the same (y1==y2), but the x values will be different (x1 != x2). In our case, the x position will start from the beginning of the canvas (x1=0), and end at the end of our canvas (x2=WIDTH*UNIT). We’ll set y1 and y2 to 1*UNIT for now.
We will do the opposite, keeping the x’s the same and y’s different (x1==x2, y1!=y2) for a vertical line. We’ll set x1 and x2 to 1*UNIT for now as well.
Congrats! now we have two lines ready to be drawn, one vertical and one horizontal.
// ... constants & setup function
function draw() {
  // ... rest of drawing code

  //(x1,y2,x2,y2)
  // Horizontal line
  line(0, UNIT * 1, WIDTH * UNIT, UNIT * 1);

  // Vertical line
  line(UNIT * 1, 0, UNIT * 1, HEIGHT * UNIT);
}
Now that you got one line of each drawn, it’s time to draw the rest of the grid! We will use a for loop to do that. we will have two for loops (though because our grid is a square, this could be achieved with a single loop since WIDTH == HEIGHT).
We will need to do some minimal alteration to our original line drawing code: simply change the value of 1 that is being multiplied by UNIT, with the value that the loop is in charge of. We will loop over the number of units on our y axis (HEIGHT) to draw the horizontal lines, and loop over the number of units we have on our x axis (WIDTH) to draw the vertical lines.
// ... constants & setup function
function draw() {
  // ... rest of drawing code

  // Horizontal lines
  for (y = 0; y < HEIGHT; y++) {
    //(x1,y2,x2,y2)
    line(0, UNIT * y, WIDTH * UNIT, UNIT * y);
  }

  // Vertical lines
  for (x = 0; x < WIDTH; x++) {
    //(x1,y2,x2,y2)
    line(UNIT * x, 0, UNIT * x, HEIGHT * UNIT);
  }
}
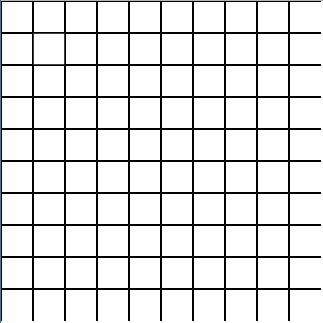
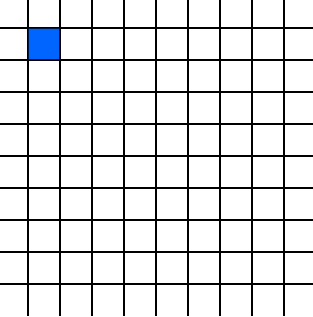
You should now have a grid drawn, as well as your square!… But, where is the square..? Let’s change the square’s color so it’s easier to distinguish it from the rest of the grid. We will need to use the function fill and give it RGB values to fill our rectangle with.
// ... constants & setup function
function draw() {
  // r, g, b
  fill(0, 100, 255); //fill w/ blue

  // ... rest of drawing code
}
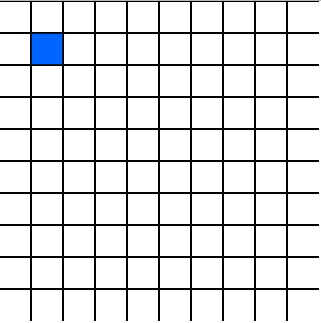
Phew, there is our square! Time to make the square move 😁
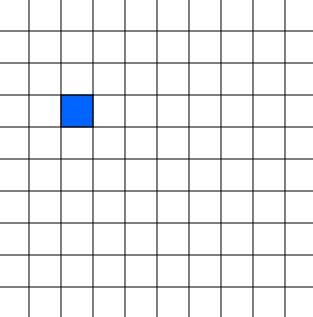
Moving Your Square
Time to make that square move! Let’s start off by using variables for the position of the square (x,y) instead of just numbers.
To do that, let’s create an object called pos to represent our position in the external scope.
After we create that variable, we will then replace the x and y coordinates of the square to use the x and y components of the position object.
// ...constants

const pos = {x:1,y:1}

// ...setup function

function draw(){
  // ... fill function

  rect(pos.x * UNIT, pos.y * UNIT, UNIT, UNIT)

  // ... grid draw loop
}
Now we need to update the x and y components of our pos according to the keys pressed.
To do so, we will use the keyIsDown function and the provided Arrow keyCodes. Since (0,0) is our top left corner, we would want to increment x when the right arrow is pressed, and decrement when the left arrow is pressed. As for y, we would want to increment when the down arrow is pressed, and decrement when the up arrow is pressed.
// ...constants & setup function
function draw() {
  // ... rest of draw function

  if (keyIsDown(LEFT_ARROW)) {
    pos.x--;
  }

  if (keyIsDown(RIGHT_ARROW)) {
    pos.x++;
  }

  if (keyIsDown(UP_ARROW)) {
    pos.y--;
  }

  if (keyIsDown(DOWN_ARROW)) {
    pos.y++;
  }
}
Time to see what we came up with! Let’s try to move around now… and… uhhh well, that’s not what we wanted now, is it?
So the reason this is happening is that the canvas is never getting cleared between frames! If we keep on drawing on that canvas every frame, and never cleaning it, the drawing from the previous frame remain!
Not to worry, there is an easy solution, the function clear. We will run it as the first thing in our drawing loop, so it will clear our canvas before each frame and get it ready for a re-draw!
// ...constants & setup function
function draw() {
  clear();
  // ... rest of draw function
}
Now that’s more like it! Our square is moving according to whatever key we pressed!
EOF
There are many directions you can take it from here! This is just the tip of the iceberg. Personally, I took this little challenge and turned it to a multiplayer game that I am actively working on and will document my progress on 😁